

Struggling with a cluttered workshop? Turn wasted wall space into a super-efficient storage system with pegboards, slatwalls, and smart organizers!
Learn how vertical storage solutions can make your workspace bigger. They keep all your tools in sight and easy to grab. Whether you’re a weekend DIYer or a serious craftsman, these space-saving hacks will change how you organize. And you won’t need to spend a lot on renovations!
Key Takeaways
- Efficiently use wall space to maximize your workshop area.
- Pegboards and slatwalls provide versatile storage options.
- Smart organizers keep tools visible and within reach.
- Transform your workshop without expensive renovations.
- Double your workspace with vertical storage solutions.
The Power of Vertical Storage in Small Workshops
Small businesses need to make the most of their workshop space to work better. In small workshops, it’s hard to keep things organized and efficient with limited space.
Identifying Workshop Space Challenges
Small workshops often struggle with clutter, not enough floor space, and tools that are hard to find. Common challenges include:
- Limited storage capacity
- Difficulty accessing tools and materials
- Inefficient use of floor space
| Challenge | Impact | Solution |
|---|---|---|
| Limited Storage | Cluttered Workspace | Vertical Storage |
| Inefficient Access | Time Waste | Organized Tool Racks |
How Vertical Storage Transforms Workflow
Using vertical storage can change how small workshops work. It lets them use wall space better, reducing clutter and making tools easier to find. This makes the workshop more efficient and organized.
Tools and materials can be kept tidy with vertical storage like pegboards and slatwall systems. This saves time and makes the workflow smoother and more productive.
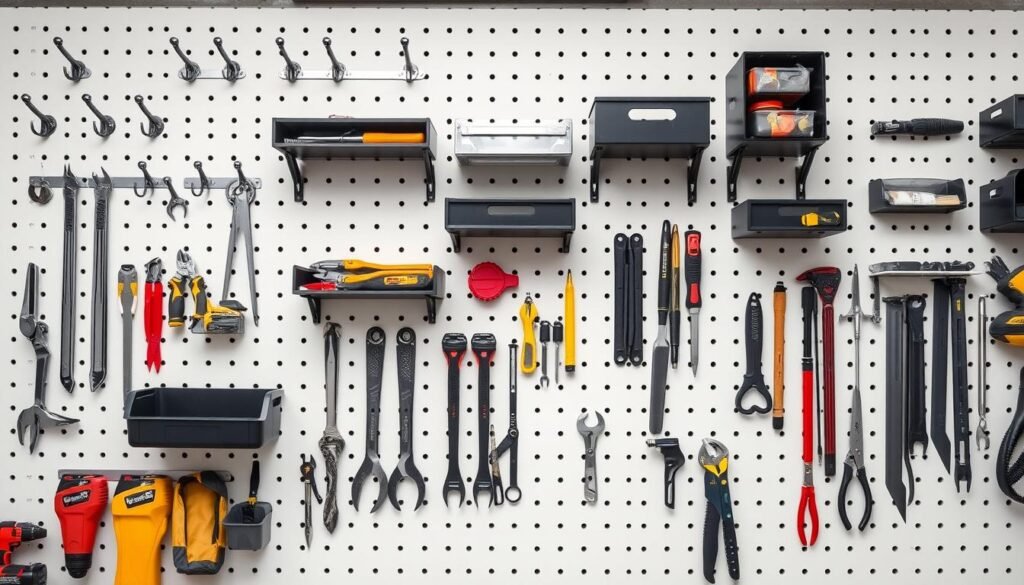
Understanding Pegboard Systems: The Ultimate Flexible Organizer
Pegboard systems are a top choice for organizing workshops. They offer great flexibility. These systems help keep tools and equipment within easy reach, making your space more efficient.

Comparing Different Pegboard Materials
Pegboard materials come in metal, wood, and plastic. Metal pegboards are strong and can hold heavy tools. Wooden pegboards give a classic look. Plastic pegboards are light and simple to set up.
| Material | Durability | Aesthetic Appeal |
|---|---|---|
| Metal | High | Modern |
| Wood | Medium | Traditional |
| Plastic | Low | Simple |
Essential Pegboard Accessories and Hooks
Choosing the right accessories and hooks is key for a pegboard system. You’ll need tool holders, bins, and various size hooks. Tool holders organize your most-used tools. Bins are for small parts and supplies.
Planning Your Pegboard Layout
Planning your pegboard layout is important. First, sort your tools by type and how often you use them. Then, arrange them on the pegboard for easy access. This way, your pegboard system will be both useful and well-organized.
How to Select the Right Pegboard for Your Workshop
Finding the right pegboard is key to a smooth workshop. It’s not just for storing tools; it helps organize them and improve your work flow.
Metal vs. Wood vs. Plastic: Making the Right Choice
You have three main pegboard materials: metal, wood, and plastic. Metal pegboards are tough and hold heavy tools well, perfect for big workshops. Wood pegboards give a classic look and can be customized to fit your space. Plastic pegboards are light and simple to put up, great for smaller areas or tight budgets.
| Material | Durability | Aesthetic Appeal | Cost |
|---|---|---|---|
| Metal | High | Modern | Moderate to High |
| Wood | Medium | Traditional | Moderate |
| Plastic | Low to Medium | Varied | Low to Moderate |
Determining Optimal Size and Coverage
Choosing the right pegboard size depends on your tools and wall space. Measure the wall where you’ll put it. Pick a size that fits well and leaves room for more tools later. Make sure it’s big enough for all your tools.
Step-by-Step Pegboard Installation Guide
To make your workshop better, use a pegboard installation guide. Putting up a pegboard is easy if you plan well and have the right tools.
Gathering Tools and Materials
First, get all the tools and materials you need. You’ll require a pegboard, hooks, a drill, a level, and wall anchors for your wall type. Make sure you have different hooks for various tool sizes and types.
- Pegboard
- Hooks (various sizes)
- Drill and bits
- Level
- Wall anchors
Measuring and Marking Your Wall Space
Getting your measurements right is key for a good pegboard installation. Measure your wall and pegboard to fit them perfectly. Mark the wall with a pencil for where the pegboard will go. Use a level to keep your marks straight.
Always double-check your measurements to avoid mistakes during installation.
Mounting Techniques for Different Wall Types
The wall type you have will decide how you mount it. For drywall, use wall anchors for extra support. For concrete or brick, use masonry bits and anchors. It’s vital to use the correct mounting hardware for a secure pegboard.

Creating Proper Spacing for Accessibility
Spacing between hooks and tools is key for easy access and function. Plan your pegboard layout so often-used tools are within reach. Make sure there’s enough space between hooks to avoid clutter.
By following these steps, you can set up a well-organized and efficient workshop with your pegboard installation.
Implementing Wall-Mounted Tool Racks and Slatwall Systems
Turning your workshop into a top-notch space is easy with wall-mounted tool racks and slatwall systems. These solutions use vertical space well. They keep your tools organized and within reach.

Installing Slatwall Panels for Heavy-Duty Storage
Slatwall panels are great for workshops. They are strong and versatile. To set them up, pick the right material and size for your tools. Make sure they can handle the weight of your tools.
Here’s how to install them:
- Measure the wall space carefully
- Mark the wall for panel placement
- Drill pilot holes for screws
- Secure the slatwall panels to the wall
After installation, slatwall panels offer a flexible storage option. You can tailor it to fit your tool needs.
Organizing Tools with Specialized Racks
Specialized tool racks are made for specific tools. They keep things organized and easy to find. To get the most from your racks and systems, follow these steps:
- Figure out the tools you need to store
- Pick racks made for those tools
- Put the racks in a spot that makes sense
Using specialized racks boosts your workshop’s efficiency and safety. It also cuts down on clutter.
Setting Up Magnetic Solutions and Wall Rail Systems
Magnetic tool holders and wall rail systems make organizing your workshop easy and efficient. They help you quickly find your tools, making your work faster and smoother.
Installing Magnetic Tool Holders for Quick Access
Setting up magnetic tool holders is simple and can really boost your workshop’s efficiency. Start by picking spots where you often need tools, like near your workbenches or on busy paths.
Steps to Install Magnetic Tool Holders:
- Choose the right magnetic strength for your tools.
- Clean the wall surface to ensure a strong bond.
- Mark the spot where you want to place the holder.
- Drill pilot holes if necessary, and screw in the holder.
- Test the holder with your tools to ensure it’s secure.
Configuring Track Rail Organizers for Versatility
Track rail organizers are great for making the most of your workshop’s storage. They let you hang different tools and accessories, keeping them handy.
| Benefits | Features to Consider |
|---|---|
| Enhanced Accessibility | Adjustable hooks and bins |
| Customizable Layout | Modular design for easy reconfiguration |
| Space Efficiency | Utilizes vertical wall space effectively |
Adding magnetic tool holders and wall rail systems to your workshop makes it more organized and efficient. You’ll work better and faster.
DIY Wall Organizers You Can Build This Weekend
This weekend, start making your workshop more organized. You can build your own wall storage solutions. It’s cheaper and lets you customize it to fit your needs.
Building a French Cleat System from Scratch
A French cleat system is great for storing tools on your workshop walls. You’ll need wood, screws, and a saw to make one. It’s simple and works well.
Step-by-Step Guide:
- Cut the wood into the right lengths for your cleat system.
- Attach the cleat to the wall with screws, making sure it’s level.
- Hang your tools or storage bins from the cleat.
Creating Storage from Repurposed Materials
Using old materials is good for the planet and adds character to your workshop. Old pallets, crates, or plastic containers make great storage.
Tips for Repurposing:
- Clean and fix up the materials before using them.
- Be creative with how you use different materials.
- Make sure the materials can hold the weight of your tools.
Designing Custom Solutions for Specialty Tools
Some tools need special storage to stay organized and easy to find. Making custom storage for these tools makes your workshop more efficient.
| Tool Type | Custom Storage Solution |
|---|---|
| Drills and Bits | Custom holder with separate compartments |
| Saws | Wall-mounted rack with saw-specific slots |
| Wrenches and Pliers | Organizer tray with dividers |
Building your own DIY wall organizers makes your workshop more organized and efficient. You can build a French cleat system, use old materials, or make custom storage for special tools. The most important thing is to make it fit your needs.
Maximizing Workshop Space with Vertical Storage Solutions
Effective workshop organization starts with using vertical space. This makes workshops more efficient and productive.
Arranging Tools Based on Frequency of Use
Organizing tools by how often they’re used is smart. Frequently used tools should be easy to reach. Less used tools can be stored higher or lower.
Creating Efficient Workflow Zones
Workshops work better with separate zones for tasks. Each zone has the tools needed for that task. This makes moving between tasks faster and boosts productivity.
| Workflow Zone | Essential Tools | Storage Solution |
|---|---|---|
| Cutting | Saws, cutting mats | Pegboard with hooks |
| Drilling | Drills, drill bits | Magnetic strip |
| Assembly | Wrenches, pliers | Slatwall with bins |
Integrating Multiple Storage Systems Seamlessly
Using different storage systems like pegboards and slatwalls makes workshops better. Integration means each system fits the workshop’s needs. This mix helps keep everything organized and efficient.
By using these strategies, workshops can use their space better. They’ll work more smoothly and be more productive. Vertical storage is key to achieving this.
Maintaining and Upgrading Your Wall Storage System
As your workshop grows, so should your wall storage. Regular upkeep and smart upgrades are key. A well-kept storage system boosts your workspace’s function and tool life.
Regular Cleaning and Inspection Routines
Keeping your wall storage clean and checked is essential. Dust and dirt can damage tools and make them hard to reach. Make it a habit to dust storage, check for wear, and ensure tools are stored right. “A clean and inspected storage system is a safe and efficient one,” cutting down on accidents and tool wear.
When and How to Expand Your Storage
Knowing when to add more storage is important for a tidy workshop. Signs include too much stuff, hard tool access, and new gear. When you need more, add solutions that fit with what you already have. This might mean more pegboards, slatwall panels, or magnetic strips for metal items. Careful planning ensures a seamless integration that boosts your workshop’s efficiency.
By being proactive with your wall storage, your workshop stays organized and efficient. It adapts to your changing needs.
Conclusion: Creating Your Ideal Workshop Storage Solution
Having a well-organized workshop is key to being more productive. Using vertical storage solutions can make your workshop more efficient. This turns your space into a streamlined area for your work.
Choosing the right vertical storage depends on your needs and the layout of your workshop. Think about the tools you use, the wall space you have, and how easy you want things to be to access.
Pegboards, slatwall systems, and magnetic solutions are great for organizing your workshop. These systems help you create a storage setup that fits your specific needs. This makes your workshop more functional and tailored to you.
Using the right storage solutions leads to a cleaner, more organized workshop. This means less clutter and more work done. Whether you love DIY projects or work professionally, a tidy workshop is vital for success.
What are the benefits of using wall organizers and pegboards in a workshop?
Wall organizers and pegboards help make your workshop more efficient. They save space and make tools easier to find. This turns your workshop into a more organized and productive place.
How do I choose the right pegboard material for my workshop?
Choosing the right pegboard material depends on what you need. Metal pegboards are strong and good for heavy tools. Wood pegboards look traditional. Plastic pegboards are cheaper but might not last as long. Think about what you need and what looks good to you.
What are the essential accessories for a pegboard system?
Key pegboard accessories include hooks, bins, and baskets. Hooks come in different types for various tools. Bins and baskets help keep small parts and supplies organized and handy.
How do I plan an effective pegboard layout?
To plan a good pegboard layout, sort your tools by type. Put often-used tools where they’re easy to reach. Measure everything to make sure it fits right and don’t overcrowd.
What is the difference between a pegboard and a slatwall system?
Pegboards have holes for hooks and accessories. Slatwall systems have slats for mounting storage. Slatwalls are more versatile and can hold more weight, making them great for heavy storage.
Can I install a pegboard or slatwall system on any type of wall?
Installing on different walls requires different steps. For drywall, use anchors or screws that reach studs. Concrete or brick walls need special fasteners. Always check the wall and system’s weight capacity for safety.