

Making a wooden bench with storage is a fun DIY project. It can make any room more useful. You can use it in your entryway, mudroom, or patio. It’s a great way to keep things organized.
This guide will show you how to make a DIY storage bench. You’ll learn about planning, measuring, assembling, and finishing. With clear measurements and photos, you can make a beautiful bench that fits your needs.
Key Takeaways
- Learn how to plan and measure your wooden bench for optimal storage.
- Discover the best types of wood and hardware for your project.
- Follow a step-by-step guide to assembling and finishing your bench.
- Explore different design options, including hinged or removable lid configurations.
- Understand how to incorporate your new storage bench into various spaces.
Why Build a Wooden Bench with Storage?
Building a storage bench is a smart move for your entryway or mudroom. It helps keep things tidy and offers a spot for storing shoes, bags, or outdoor gear.
Practical Benefits of a Storage Bench
A storage bench brings many benefits. It keeps your home organized by providing a specific spot for items. This is super helpful in busy areas like entryways or mudrooms. Plus, it’s a cozy place to sit.
Key benefits include:
- Clutter reduction
- Convenient storage
- Additional seating
Cost Savings Compared to Store-Bought Options
Building your own bench can save you money. You get to pick the materials and design, which lets you control costs. Here’s a look at what you might spend:
| Material | Estimated Cost |
|---|---|
| Lumber (2x4s, plywood) | $50-$100 |
| Hardware (screws, hinges) | $20-$50 |
| Finishing materials (stain, paint) | $30-$70 |
| Total | $100-$220 |
Tools and Materials Needed for the Project
Getting the right tools and materials is key to making your wooden storage bench. Having everything ready before you start makes the project go smoother. It also helps avoid delays.
Essential Woodworking Tools
You’ll need some essential woodworking tools to begin. These include:
- A table saw or circular saw for making straight cuts
- A drill press or hand drill for drilling precise holes
- Sanders for smoothing out the wood surfaces
- A measuring tape and square for ensuring accurate measurements
- Clamps for holding pieces together while gluing
Quality tools can greatly improve your project’s outcome.
Materials Shopping List with Estimated Costs
Here’s a list of materials you’ll need, along with estimated costs:
- 2×4 lumber for the frame ($20-$30)
- 3/4 inch plywood for the top and storage compartment ($30-$40)
- Hinges and screws ($10-$15)
- Wood glue and clamps ($10-$20)
- Sandpaper and finishes (stain, paint, or varnish) ($20-$30)
The total cost can range from $90 to $135. This depends on the specific materials and brands you choose.
Choosing the Right Wood and Hardware for Your Bench
When you’re making a wooden bench with storage, picking the right materials is key. The wood and hardware you choose affect the bench’s quality and how well it works. A homemade storage bench will look and last better if you make the right choices.
Best Wood Types for Durability and Appearance
The wood you pick is very important. It affects how durable and good-looking your bench will be. For example, oak and maple are strong and don’t wear out easily. They’re perfect for a bench with storage for mudroom that gets a lot of use.
| Wood Type | Durability | Aesthetic Appeal |
|---|---|---|
| Oak | High | Classic, traditional look |
| Maple | High | Light, modern appearance |
| Pine | Medium | Rustic, natural look |
Hardware Selection Guide: Hinges, Screws, and Handles
Choosing the right hardware is as important as picking the wood. Hinges, screws, and handles need to be strong and match your bench’s design. Use heavy-duty hinges for the lid, corrosion-resistant screws, and handles that are easy to hold.
- Heavy-duty hinges for durability
- Corrosion-resistant screws for longevity
- Ergonomic handles for ease of use
Planning and Measuring Your Wooden Bench: A Detailed Guide with Measurements
Before starting your wooden bench with storage, planning and measuring are key. A well-planned bench offers comfort, function, and looks great.

Standard Bench Measurements and Ergonomics
Most benches are 18 to 20 inches tall, comfy for adults. The depth varies, but 16 to 20 inches is common. This size is not too big but big enough for sitting.
Think about the storage compartment too. Choose its size based on what you’ll store. For shoes, the space should be at least 6 inches high.
Customizing Dimensions for Your Space
Standard sizes are a good start, but you might need to adjust for your space. Measure the area for your bench, considering length and width. For example, a long, narrow bench fits well in narrow entryways.
Creating a bench building guide for your space is smart. Think about the room’s layout and the bench’s purpose. A step-by-step guide will help you make a bench that’s both useful and looks good.
By planning and measuring well, your wooden bench will meet your needs and fit perfectly.
Cutting the Wood Accurately: Step-by-Step
Cutting wood accurately is key when building a wooden storage bench. It needs patience and skill. When making your DIY wooden bench with a lift-up seat, precise cutting is vital for success.
Creating a Cutting List with Measurements
Start by making a detailed cutting list. It should include the wood needed for each part of your bench. This list should have the quantity, dimensions, and type of wood for each piece.
For a bench with a lift-up seat, remember to include the seat’s size, hinges, and any extra support. A detailed cutting list makes cutting easier.
Precision Cutting Techniques
Getting precise cuts needs the right tools and techniques. Use a sharp saw blade and keep your hand steady. For straight cuts, a table saw or circular saw works best. A jigsaw is better for curved cuts.
“Measure twice, cut once” is very true in woodworking. Always double-check your measurements before cutting. This can prevent expensive mistakes.
Safety Precautions While Cutting
Always put safety first when cutting wood. Wear safety glasses and ear protection to avoid sawdust and loud noises.
“The key to safety is in not neglecting the simple precautions that can prevent serious injury.”
Keep your work area clean and free of debris to avoid accidents. By following these safety tips, you can have a safe and successful woodworking project.
Assembling the Bench Frame and Base
Now that you have all the pieces cut, it’s time to put the bench frame and base together. This step is key to making a solid foundation for your storage bench. It involves several important steps to ensure your bench is both sturdy and functional.
Building the Base Structure
The base structure is the foundation of your bench. It’s important to get this right to ensure your bench is stable and durable.
Joining Corner Pieces Properly
To join the corner pieces, use wood glue and 2-inch wood screws. Make sure the corners are square by checking the diagonals. They should be equal in length. Use clamps to hold the pieces in place while you screw them together.
Adding Support Braces
Support braces are key for stability in your bench base. Place them evenly between the side frames, securing them with wood screws. This helps distribute weight evenly and prevents the bench from sagging.
Reinforcing for Weight and Stability
To make sure your bench can handle the weight, you need to reinforce it. This means checking the joints, ensuring the frame is level, and making any needed adjustments.
- Check all joints for tightness and make sure they are securely fastened.
- Use additional support if necessary, for heavy items.
- Test the bench by applying weight gradually to ensure it remains stable.
By following these steps, you’ll create a sturdy mudroom bench with compartments that will last for years.
Building and Installing the Storage Compartment
To make your wooden bench more useful, adding a storage compartment is key. This space will keep your things tidy and boost the bench’s function.
Constructing Storage Dividers and Compartments
Start by making dividers and compartments. Measure and cut wood for the partitions. Precision is key for a good fit and lots of storage.
Maximizing Storage Space Efficiently
For the best storage, measure well and install dividers securely. This keeps things organized and easy to find.
Measuring for Optimal Storage
Measure the bench’s inside to plan your storage layout. Think about the size and type of items you’ll store. Accurate measurements lead to a better storage setup.
Installing Dividers Securely
After measuring, install the dividers. Use the right hardware to hold them in place, so they can handle the stored items’ weight. A secure installation stops dividers from moving or falling.
| Component | Material | Quantity |
|---|---|---|
| Storage Dividers | Plywood | 4 |
| Compartment Sides | Solid Wood | 8 |
| Screws | Steel | 20 |
By doing these steps, you’ll have a useful storage area for your bench. The storage bench with hinged lid will add storage and beauty to your space.
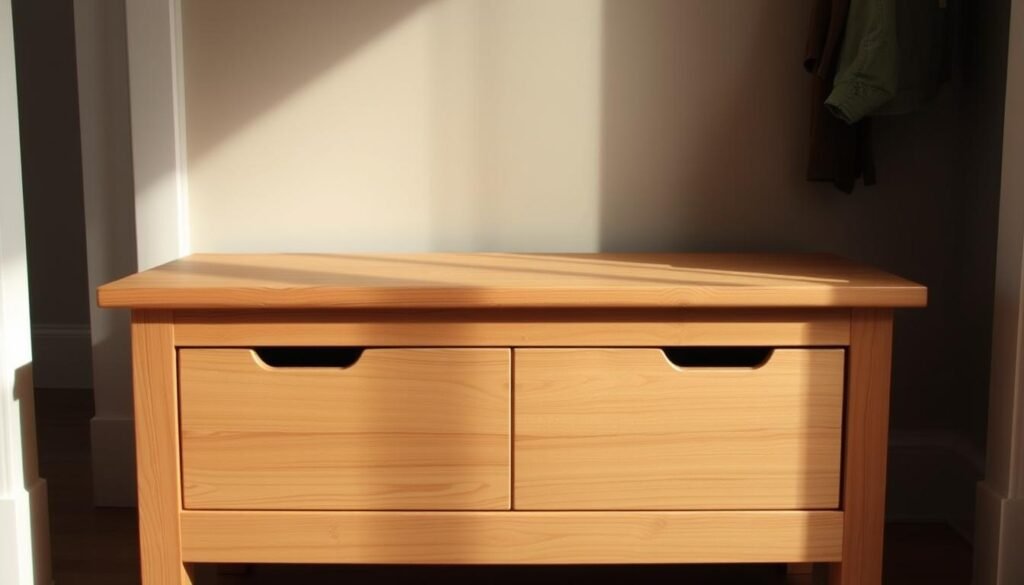
Attaching the Top: Hinged or Removable Lid Options
Attaching the top to your wooden bench is a key step. You can choose between a hinged lid or a removable top. Each option has its own benefits, depending on your needs and preferences.
Installing a Hinged Lid with Safety Features
A hinged lid makes it easy to get into the storage area. To set up a hinged lid, pick the right hinges and place them correctly.
Selecting and Positioning Hinges
Pick hinges that are strong and can handle the lid’s weight. Soft-close hinges are a smart choice as they stop the lid from slamming. Make sure the hinges are placed so the lid opens all the way without any blockage.
Adding Lid Supports or Soft-Close Mechanisms
Lid supports or soft-close mechanisms add safety by stopping the lid from closing by accident. They also make opening and closing the lid easier. For heavy lids, think about using gas lift hinges.
Creating a Removable Top Alternative
A removable top gives you more flexibility. It’s a good choice if you don’t want a hinged mechanism. Make sure the top fits well on the bench.
Use magnets or latches to keep the top in place. This design lets you remove the top easily when you need to.
| Feature | Hinged Lid | Removable Top |
|---|---|---|
| Access Method | Opens on hinges | Lifts off completely |
| Safety Features | Soft-close hinges, lid supports | Magnets, latches |

When choosing between a hinged lid and a removable top, think about what you need. Consider the functionality you want for your DIY storage bench.
Sanding, Finishing, and Painting Your Bench
After building your wooden bench with storage, it’s time to sand, finish, and maybe paint it. These steps are key to making your bench look great and last long. They help you get a professional finish and keep your homemade storage bench in top shape.
Proper Sanding Techniques for a Smooth Finish
Sanding is essential to remove wood imperfections like splinters or rough spots. Begin with coarse-grit sandpaper (120-grit) and move to finer grits (220-grit or higher) for a smooth finish. Always sand in the wood grain direction to prevent scratches.
Staining vs. Painting: Pros and Cons
Choosing between staining and painting your bench with hidden storage depends on your desired look and protection level. Staining brings out the wood’s natural beauty and adds protection. Painting gives you more color choices and can hide imperfections, but it may conceal the wood’s grain.
Applying Protective Finishes for Longevity
After sanding and staining or painting, apply a protective finish to seal your bench. You can use polyurethane, varnish, or a waterproof sealant. Apply thin coats, letting each dry as instructed, for a durable finish on your wooden bench plans.
Where to Use Your Storage Bench: Entryway, Mudroom, or Patio
Your new storage bench can fit well in many spots around your home. It’s great for entryways, mudrooms, or even patios. The best spot depends on what you need and the bench’s design.
Indoor Placement Ideas and Considerations
Think about putting your bench in the entryway or mudroom indoors. In an entryway, it’s perfect for keeping shoes, bags, and accessories tidy. A mudroom bench helps organize dirty shoes, sports gear, and coats. Make sure the bench fits well and doesn’t block the way.

Outdoor Usage and Weather Protection
For outdoor use, like on a patio or by the pool, check if the bench can handle the weather. Add a protective coat to keep it safe from rain and sun. You can also put waterproof bins inside for cushions, toys, or gardening tools.
| Location | Usage | Considerations |
|---|---|---|
| Entryway | Store shoes, bags, accessories | Proportionate size, unobstructed traffic flow |
| Mudroom | Store dirty shoes, sports equipment, outerwear | Durable materials, easy cleaning |
| Patio | Store cushions, outdoor toys, gardening tools | Weather-resistant materials, protective finish |
Common Mistakes to Avoid During Assembly
Starting a successful assembly means knowing what mistakes to steer clear of. When making a wooden bench with storage, paying close attention to details is key. This helps avoid errors that can ruin your final product.
Measurement and Cutting Errors
Measuring and cutting wood accurately is a critical step. Measurement errors can cause parts to not fit right. Cutting errors can waste material or make edges unsafe. To prevent these, always double-check your measurements and use a sharp saw.
| Error Type | Consequence | Prevention |
|---|---|---|
| Measurement Errors | Ill-fitting parts | Double-check measurements |
| Cutting Errors | Wasted material or unsafe edges | Use a sharp saw blade |
Assembly and Finishing Pitfalls
When assembling, make sure all parts are aligned and fastened well. Insufficient tightening can make the bench unstable. Over-tightening can harm the wood. Also, when applying finishes, follow the instructions to avoid uneven coats or drying issues.
Conclusion: Your Handcrafted Wooden Bench with Storage
Making a diy wooden bench with a lift-up seat or built-in storage is rewarding. It adds function to your space and makes you feel accomplished. You’ve learned to plan, assemble, and finish a beautiful piece of furniture. It can be used in many places, like entryways or patios.
A handcrafted bench adds a personal touch to your home. It can have a hinged lid or a removable top. Your bench will become a favorite place to sit and relax. The storage keeps your space organized and clutter-free.
Looking at your finished bench, think about the skills you’ve gained. You’re now ready for more woodworking projects. You can create unique pieces that show your style and creativity.
What type of finish should I apply to my wooden bench to protect it?
The finish depends on the wood and its use. You can stain, paint, or apply a clear coat. Think about durability, upkeep, and look when choosing.
What are some common mistakes to avoid when building a wooden bench with storage?
Avoid measurement and cutting errors, bad joinery, and weak structure. Make sure to measure right, use proper joinery, and reinforce well to avoid these mistakes.
How do I ensure my storage bench is sturdy and can support weight?
Use strong joinery like mortise and tenon or dovetail joints. Add support braces for extra stability. The right hardware, like hinges and screws, also matters a lot.
How do I choose the right type of wood for my storage bench?
The wood type depends on durability, look, and budget. Oak, pine, and maple are popular choices. Think about moisture resistance and the bench’s weight capacity when picking.