
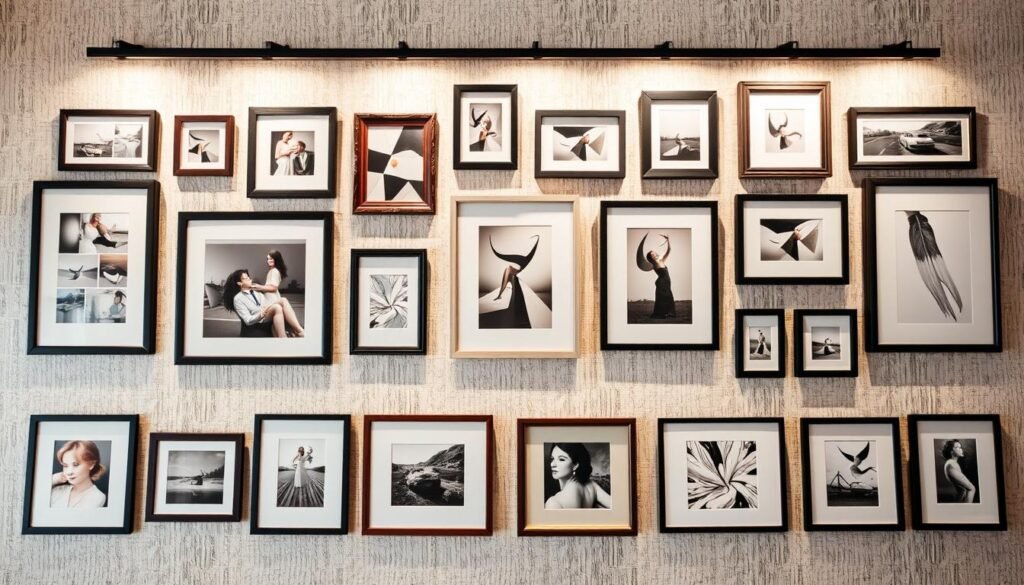

A well-designed gallery wall arrangement can make your space more personal and beautiful. By learning how to professional frame hang, you can turn empty walls into amazing displays. These displays can show off your favorite memories and art.
A hanging picture frame wall is more than just frames. It’s a carefully chosen display that brings character to any room. With the right methods, you can create a picture wall layout that looks balanced and stunning. This way, you avoid the problems of crooked frames and uneven walls.
Key Takeaways
- Understand the basics of creating a visually appealing gallery wall arrangement.
- Learn how to measure and space frames for a balanced display.
- Discover the right hardware for professional frame hanging.
- Explore tips for choosing the perfect picture wall layout.
- Avoid common mistakes that lead to crooked frames and damaged walls.
Why Gallery Walls Elevate Your Home Décor
A well-designed gallery wall can instantly transform a room, making it a focal point of your home. By incorporating a mix of frame sizes and styles, you can achieve a visual weight balance that draws the eye and creates visual interest.
The Visual Impact of a Well-Designed Gallery Wall
A gallery wall can significantly enhance the aesthetic appeal of a room. By using grid layout patterns or opting for a salon-style hanging approach, you can create a unique display that showcases your personality. The key is to balance the arrangement by considering frame size progression and negative space design.
How Gallery Walls Transform Empty Spaces
Empty walls can make a room feel bare and uninviting. A gallery wall can transform these spaces into vibrant areas that capture attention. By carefully planning the layout and selecting frames that complement the room’s decor, you can create a focal point placement that elevates the entire space.
Personal Expression Through Curated Displays
Gallery walls offer a unique opportunity for personal expression. By curating a collection of frames that reflect your interests, travels, or family memories, you can create a display that tells a story. This curated approach allows you to showcase your personality and add a personal touch to your home decor.
Planning Your Perfect Gallery Wall Layout
A well-designed gallery wall starts with a thoughtful layout. This balance is key to making it visually appealing. To achieve this, consider several design principles and strategies.
Design Rules for a Balanced Display
Creating a balanced display means understanding visual balance and sightline principles. A balanced arrangement makes the gallery wall pleasing to the eye. It also draws the viewer’s attention effectively.
- Consider the size and scale of the frames in relation to the wall and surrounding furniture.
- Balance large frames with smaller ones to create visual interest.
- Use a unifying element, such as a common frame style or color, to tie the arrangement together.
Symmetrical vs. Asymmetrical Arrangements
The choice between symmetrical and asymmetrical arrangements depends on the desired aesthetic and the space’s characteristics. Symmetrical arrangements offer a sense of order and formality. On the other hand, asymmetrical arrangements provide a more dynamic and relaxed feel.
Creating Templates Before Hanging
Before hanging your gallery wall, creating a template can help visualize the final arrangement. Use paper cutouts or digital tools to mock up the layout. This allows for adjustments before making any holes in the wall.

Focal Point Placement Strategies
Identifying a focal point in your gallery wall helps guide the viewer’s attention. Strategies include placing a larger or more striking piece at the center. You can also use a bold frame to draw the eye.
- Use a prominent piece as the focal point.
- Experiment with different placements to find the most visually appealing arrangement.
Selecting the Right Frames for Your Display
The success of your gallery wall depends on the frames you choose. A good frame can make your artwork stand out. But a bad one can pull it down.
Mixing Frame Sizes and Styles Successfully
Mixing frame sizes and styles adds depth to your gallery wall. Here are some tips:
- Start with a common style or color to tie everything together.
- Use different sizes to create a visual hierarchy.
- Balance ornate frames with simpler ones.
By mixing frames thoughtfully, you can make a unique and engaging display.
Color Coordination Strategies
Color coordination is key for a cohesive gallery wall. Look for a common thread in your frames, mats, and artwork. You can also match frames to your room’s colors for continuity.
Material Considerations for Different Spaces
The material of your frames affects your gallery wall’s look. Metal frames add a modern touch. Wooden frames bring warmth and coziness.
Budget-Friendly Frame Options
You don’t have to spend a lot to make a beautiful gallery wall. Look for affordable frames at thrift stores, discount stores, or online. You can also repurpose old frames or use unique items as frames.
By considering these tips, you can create a stunning gallery wall that shows off your style and complements your home.
Mastering Measurements and Spacing
Creating a perfect gallery wall is more than picking frames. It’s about precise measurements and spacing. Understanding how to place frames is key to a harmonious display.
The Golden Ratio for Perfect Alignment
The golden ratio, about 1.618, has been a design secret for ages. It makes art and designs look good. On gallery walls, it ensures a balanced look. Using it for spacing makes your display eye-catching and natural.
Optimal Spacing Between Frames
Spacing frames right keeps your gallery wall looking good. Keep gaps between frames consistent, usually 2 to 6 inches. Try different gaps on paper or with digital tools to find the best fit.
Eye-Level Placement Principles
Eye-level placement is key for a captivating gallery wall. The center should be between 57 and 67 inches from the floor. But, this can change based on your ceiling and room furniture.
Using Measuring Tools Effectively
Accuracy is vital. Use a laser level for straight lines and a measuring tape for frame and wall sizes. Measuring carefully and marking the wall will make your gallery wall look great.
Essential Tools for Creating a Hanging Picture Frame Wall
To make a picture frame wall look great, you need the right tools. Having the right equipment is key for a professional look.
Must-Have Hardware and Measuring Tools
For hanging frames, you need the right hardware. This includes durable wall anchors, picture hanging kits, and measuring tapes. A quality level tool is also important to keep frames straight.
Laser Levels vs. Traditional Methods: Which is Best?

Laser levels and traditional bubble levels both have their fans. Laser levels are precise and easy to use, showing a straight line on the wall. Traditional methods are reliable but can take longer and are more likely to have mistakes. For big gallery walls, laser levels are usually the better pick.
| Tool | Description | Benefit |
|---|---|---|
| Laser Level | Projects a precise laser line | Ensures straight alignment |
| Measuring Tape | Measures distances between frames | Helps maintain even spacing |
| Stud Finder | Locates wall studs | Ensures secure hanging |
Picture Hanging Kits and Their Components
Picture hanging kits come with D-rings, screws, and wall anchors. They help hang frames of all sizes and weights.
Stud Finders and Wall Scanners
A stud finder is key for finding studs behind your wall. It’s vital for hanging heavy frames. Some wall scanners can also find electrical wiring and pipes, making them safer.
With these tools, you can create a beautiful picture frame wall. It will showcase your favorite memories and artwork.
Choosing the Right Wall Anchors and Hardware
To keep your picture frames on the wall, picking the right anchors and hardware is key. The type of wall and the weight of the frames need specific solutions. This prevents damage or collapse.
Hardware Options for Different Wall Types
The wall type you have will tell you what anchor to use. Drywall needs drywall anchors or screws. Plaster walls are best with plaster anchors or toggle bolts.
Concrete walls need concrete anchors or screws. Wooden studs can be secured with simple screws.
| Wall Type | Recommended Anchor |
|---|---|
| Drywall | Drywall Anchors/Screws |
| Plaster | Plaster Anchors/Toggle Bolts |
| Concrete | Concrete Anchors/Screws |
| Wooden Studs | Screws |
Weight Considerations for Frame Hanging
The weight of your frame is very important. Heavier frames need stronger hanging solutions. Always check the weight limit of your hardware to make sure it can hold your frame.
D-Ring vs. Sawtooth vs. Wire Hanging Systems
D-Rings are strong and good for heavy frames. Sawtooth hangers are easy to adjust and work for lighter frames. Wire hanging systems let you place frames anywhere and ensure they hang level.

Rental-Friendly Hanging Solutions
For renters, it’s important to use solutions that don’t harm the walls. Adhesive strips or removable wall hooks are perfect. They are easy to take down without leaving marks.
By picking the right wall anchors and hardware, your gallery wall will be beautiful, secure, and last long.
Step-by-Step Guide to Hanging Your Gallery Wall
With a clear plan and the right techniques, hanging your gallery wall can be a straightforward and enjoyable DIY project. This guide will walk you through the process, ensuring your display looks professional and polished.
Preparing Your Wall and Frames
Before you start, prepare your wall and frames. Clear the area around your wall and cover the floor with a drop cloth. Remove any existing hangings or decorations from the wall. Then, inspect your frames for dust or debris and clean them if necessary. Make sure all frames have the right hanging hardware attached.
Marking and Measuring Techniques
Accurate measurements are key for a balanced gallery wall. Start by measuring the width of your wall and the total width of your layout. Use a pencil to mark the spot for the first frame, considering height and spacing. Use a level to ensure your marks are straight. Consider using a template or grid paper to visualize the arrangement.
Securing Frames in Perfect Alignment
Once you’ve marked the wall, it’s time to hang your frames. Start with the center frame and work your way outward. Use a nail or screw that fits your wall type, and gently hammer or screw it into the marked spot. For heavier frames, use wall anchors for extra support. As you hang each frame, step back to check alignment and make adjustments as needed.
Final Adjustments for Professional Results
After hanging all your frames, take a step back to evaluate your gallery wall. Make any necessary adjustments to spacing or alignment. Check that the frames are level and evenly spaced. This is also a good time to dust or clean any frames that may have gotten dirty during the hanging process.
Troubleshooting During Installation
Even with careful planning, issues can arise during installation. Common problems include crooked frames or uneven spacing. If a frame is slightly crooked, you can adjust it by gently twisting it into place. For more significant issues, you may need to remove the nail and rehang the frame. Stay patient and take your time to achieve the perfect display.
Avoiding Common Gallery Wall Mistakes
A stunning gallery wall starts with avoiding common mistakes. These errors can make your display look messy. By knowing what to avoid, you can create a beautiful and cohesive display.
Preventing Crooked Frames and Uneven Spacing
One big mistake is hanging frames crookedly or with uneven spacing. Use a laser level to keep frames straight. Also, measure the distance between frames carefully. A good starting point is 2-4 inches between frames.
- Use a laser level to ensure straight frames
- Measure the distance between frames carefully
- Maintain consistent spacing between frames
Solutions for Patchy or Damaged Walls
Dealing with patchy or damaged walls? Use a wall repair compound to fill holes or cracks. For bigger damage, you might need to replace the drywall or get a professional’s help.
Addressing Frame Slippage Issues
Frame slippage happens when frames shift, making them crooked. Use anti-slip hangers or adhesive-backed hangers to prevent this. Also, hang the frame level and ensure the hardware is securely attached.
Fixing Mistakes Without Additional Wall Damage
Don’t worry if you made a mistake with your gallery wall. To fix it without more damage, use a filler compound for holes. For bigger mistakes, consider removing and re-hanging the frame. With patience and the right tools, you can fix your mistakes and get a flawless gallery wall.
Conclusion: Maintaining and Refreshing Your Gallery Wall
A well-designed gallery wall can make your home look amazing. But, it needs regular care to stay in top shape. Start by dusting your framed art with a soft, dry cloth to avoid dust.
For glass frames, use a microfiber cloth and a mix of water and white vinegar. This gentle method prevents streaks and residue. Check your frames often for any signs of slippage or misalignment. Adjust them as needed to keep them straight.
Think about changing your gallery wall with the seasons. You can swap a few frames or change the layout for a fresh look. This keeps your wall interesting and in line with your current style.
By following these easy tips, your gallery wall will stay beautiful and be a highlight of your home. Regular care also helps your frames and artwork last longer.
What is the best way to determine the ideal frame spacing for a gallery wall?
The best frame spacing for a gallery wall is 2-4 inches. This depends on the frame size and style. You can use a template or layout tool to find the perfect spacing.
How do I choose the right wall anchors for my gallery wall?
Choose wall anchors based on your wall type. Drywall needs drywall anchors or screws. Plaster or brick walls need specialized anchors or screws. Make sure the anchors can hold the weight of your frames.
What is the best way to hang a heavy frame on a wall?
For heavy frames, use a strong wall anchor or screw. Find the wall studs with a stud finder for extra security. Consider using a French cleat or a hanging system for heavy frames.
How do I create a balanced and visually appealing gallery wall?
Balance your gallery wall by considering frame size and layout. Mix frame styles and textures for interest. Use a template or layout tool to achieve balance.
Can I hang a gallery wall on a wall with uneven surfaces or texture?
Yes, but plan carefully. Use a level and laser level for straight frames. For textured walls, use anchors designed for them or adhesive options.