

Make your home a haunted haven this Halloween season with DIY ghost lanterns. You can use simple materials to create an eerie feel. This will make your guests feel a chill.
These lanterns are not only simple to make but also add a personal touch. With basic supplies, you can create a spooky ambiance. Your home will surely stand out.
Key Takeaways
- Create a spooky atmosphere with DIY ghost lanterns
- Use simple materials to craft your own lanterns
- Add a personal touch to your Halloween decorations
- Make your home stand out with a unique ambiance
- Easy to make and customize
Spooky & Easy DIY Ghost Lanterns for Halloween
Ghost lanterns are a big hit for Halloween. They’re easy to make and really set the mood. These lanterns can light up your home inside and out, making it feel spooky and fun.
Why Ghost Lanterns Make Perfect Halloween Decorations
Ghost lanterns are great for Halloween because they’re both spooky and classy. You can make them with simple stuff like mason jars, cheesecloth, and a light. They give off a soft, eerie light that’s perfect for Halloween. A quote from The Spruce Crafts says, “Ghost lanterns are a creative way to add a touch of spookiness to your Halloween decor.”
“Ghost lanterns are a creative way to add a touch of spookiness to your Halloween decor.” –
The Spruce Crafts
Ghost lanterns are also super flexible. You can play around with different materials and designs. This lets you make lanterns that really show off your style.
| Benefits of Ghost Lanterns | Description |
|---|---|
| Easy to Make | Simple materials required |
| Spooky Ambiance | Creates a haunting glow |
| Customizable | Experiment with different designs |
What You’ll Learn in This Guide
In this guide, we’ll show you how to make your own DIY ghost lanterns. You’ll learn how to pick the right stuff, put them together, and make them fit your Halloween look. We’ll share tips on using cheesecloth and mason jars to make your lanterns spooky yet stylish.
By the end of this guide, you’ll know how to make your own ghost lanterns. This will make your Halloween even more special.
Materials & Tools You’ll Need
To make your own DIY ghost lanterns, you’ll need some basic stuff. The right tools will help you get that spooky look you want.
Essential Supplies for Basic Ghost Lanterns
You’ll need a container like a mason jar or glass vase for the base. Cheesecloth or similar fabric is key for the ghostly look. A hot glue gun is needed to stick the fabric to the container. A battery-operated tea light or small LED light will light it up.
Optional Materials for Advanced Designs
For more creative ghost lanterns, try different textures like lace or gauze. You can also add glitter, rhinestones, or paint for a unique look. For detailed designs, wire or a hot glue gun can help create patterns or shapes.
Tools That Make the Process Easier
The right tools can really help your DIY project. A hot glue gun is key for attaching the cheesecloth. You’ll also need scissors for cutting cheesecloth cleanly. A glass cutter or sharp object can be useful for glass containers, but not essential. Working on a surface and wearing gloves to protect your hands from glue are also good ideas.
Choosing the Right Base for Your Ghost Lantern
The base of a ghost lantern is key to its look and durability. It’s the start of your DIY project, affecting both how it looks and works.
Mason Jars vs. Glass Containers
Mason jars and glass containers are top picks for ghost lanterns. They’re clear and strong. Mason jars are great for wrapping fabric around because of their wide mouths. Glass containers offer more shape and size options.
Think about what shape and size you want your lantern to be when choosing.
Plastic Alternatives for Kid-Friendly Projects
For kids’ projects, plastic containers are safer and easier to clean. They’re less likely to break. Make sure they can hold the weight of your materials.
Size Considerations for Different Display Options
The size of your lantern base depends on where you’ll display it. Big lanterns are great for porches or entryways. Small ones fit well on tables.
Think about the size of your display space when picking a base.
Wondering if to use mod podge or white glue for your ghostly form? Mod podge dries fast and is hard, but white glue is easy to find and clean up. For light, pick battery tea lights or candles, or go for safe LED lights for Halloween.
Step-by-Step: Classic Cheesecloth Ghost Lantern
Making a cheesecloth ghost lantern is easy and adds a spooky touch to your Halloween decor. It’s a simple project that requires minimal supplies. It’s great for those who want a quick and easy DIY project.
Preparing Your Base Container
You’ll need a base container for your ghost lantern. Choose a glass jar, lantern, or any other shape and size you like. Make sure it’s clean and dry before you start. A mason jar is a popular choice for glow-in-the-dark ghost jars and adds an authentic look.
Cutting and Shaping the Cheesecloth
Cut a piece of cheesecloth big enough to wrap around your container. The size depends on your container’s dimensions. For a mason jar, a piece 2-3 times the jar’s height works well. Wrap the cheesecloth around the container, making sure it’s not too tight or too loose.

Applying Adhesive and Creating the Ghost Form
To shape your ghost lantern, apply an adhesive to the cheesecloth. Use a mix of water and white glue or a spray adhesive. Spread it evenly over the cheesecloth. As you apply, shape the cheesecloth into a ghostly form with folds and creases for a natural look.
Drying and Setting Your Creation
Let your ghost lantern dry completely. This may take a few hours or overnight, depending on the adhesive and cheesecloth thickness. Once dry, carefully remove it from the base container. Add a light source, like a LED candle, for a warm glow. This is a quick Halloween decor idea and a fun project to do with family or friends.
Follow these steps to make a stunning and eerie cheesecloth ghost lantern. Try different shapes, sizes, and lighting to make it unique. For an even more dramatic effect, learn how to make floating ghost lanterns.
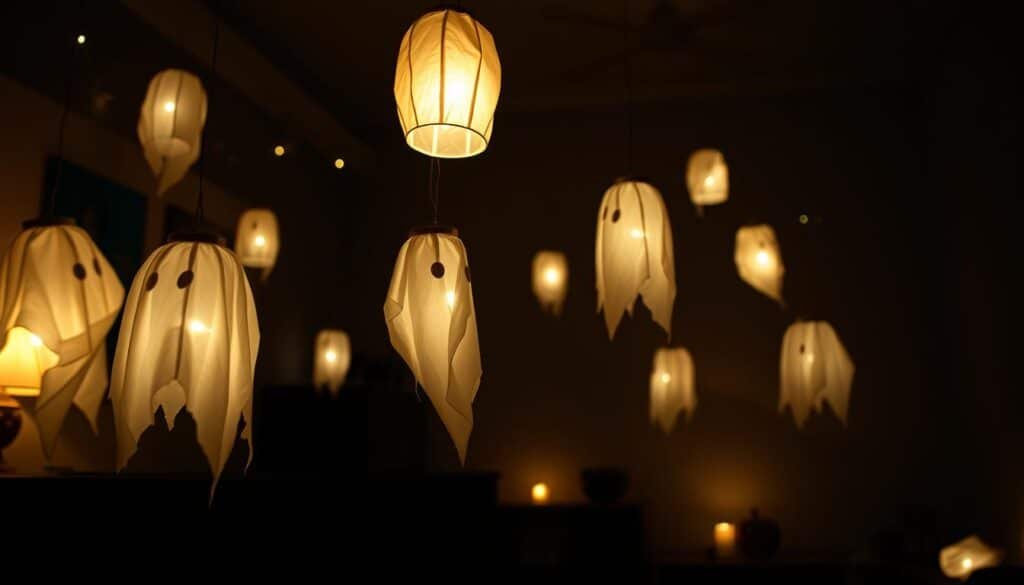
Creating Spooky Ambiance with Simple Materials: Floating Ghost Lanterns
To make your Halloween decor stand out, try making floating ghost lanterns. They will amaze your guests. This trick is easy to do and looks amazing.
The Illusion Technique Explained
To make it seem like the lanterns are floating, use a thin wire or fishing line. This wire or line hangs the lanterns from above. It makes them look like they’re floating, adding to the spooky feel.
Step-by-Step Assembly Instructions
To make your floating ghost lantern, just follow these steps:
- Start with your ghost lantern, made from cheesecloth or something similar.
- Attach a thin wire or fishing line to the top of the lantern.
- Hang the lantern from a strong structure above.
Hanging Methods for Maximum Effect
To get the best effect, hang your lanterns so they seem to move. Use a weatherproof ghost lantern to keep them safe outside. Hang them from trees or the porch ceiling.
By following these steps, you can create a spooky atmosphere. It will impress your Halloween guests.
No-Sew Fabric Ghosts for Quick & Mess-Free Options
No-sew fabric ghosts are a simple, mess-free way to decorate for Halloween. They’re great for those who don’t want to sew or glue fabric.
Selecting the Right Fabric Types
Choosing the right fabric is key for no-sew fabric ghosts. Lightweight fabrics like cheesecloth or voile work well. They drape nicely and are easy to shape. For a more ethereal look, use sheer fabrics that let light through.
Assembly Without Glue or Sewing
To make your no-sew fabric ghosts, start by draping fabric over a balloon or wire frame. Adjust it to shape a ghostly figure. Secure it with knots or ties. This way, you can make a ghost without glue or sewing.
Adding Character with Simple Adjustments
You can make your ghosts more interesting with simple changes. For example, adjust the fabric to change the face’s look. Add cute features or use bright fabrics to make them kid-friendly.
By following these steps, you can create a spooky yet welcoming Halloween display. If your cheesecloth isn’t sticking, try different adhesives or dry it with a hairdryer. This might help.
Battery-Operated vs. Real Candles: Safety Considerations
When choosing between battery-operated or real candles for your ghost lanterns, safety is key. Both have their good and bad sides. Knowing these can help you have a fun and safe Halloween.
Pros and Cons of Different Light Sources
Real candles give a cozy, real light to your lanterns. But, they can be dangerous, like around flammable stuff. Battery-operated candles, like those with LED lights, are safer. They don’t lose the spooky feel.
| Light Source | Safety | Ambiance |
|---|---|---|
| Real Candles | High Risk | Authentic Glow |
| Battery-Operated LED | Low Risk | Versatile Ambiance |
Fire Safety Tips for Real Candles
If you want to use real candles, make sure they’re on stable holders. Keep them away from anything that can catch fire. Never leave them burning alone. Also, make sure kids and pets can’t get to them.
“The safest candles are those that are monitored closely and used in a controlled environment.”
Best LED Options for Different Effects
LED candles are a safer choice. They come in different styles, like flickering or changing colors. Look for safe LED lights for Halloween that work well indoors or outdoors.
When you compare battery tea lights vs. candles, think about how long they last and how easy they are to use. Battery tea lights are a safe, easy way to light up your lanterns without the danger of real flames.
Creepy Customizations: Adding Personality to Your Ghosts
Make your ghost lanterns stand out by adding glow-in-the-dark paint and creative touches. Customizing them can take your Halloween decor to the next level. It makes your lanterns truly one-of-a-kind.
Glow-in-the-Dark Paint Techniques
Adding glow-in-the-dark paint is a great way to give your lanterns an eerie glow. Apply it to the cheesecloth or fabric for a haunting effect. You can also use it to draw spooky designs or patterns.

Creating Facial Features and Expressions
Adding a face to your ghost lanterns makes them more engaging. Use markers, paint, or glue to create eyes, mouths, and more. Try different expressions to show a range of emotions, from spooky to friendly.
Weatherproofing for Outdoor Display
If you’ll be showing your lanterns outside, make sure to weatherproof them. Use a waterproof sealant to keep them dry in the rain. Also, apply a UV-resistant coating to prevent fading from sunlight.
| Customization Technique | Description | Effect |
|---|---|---|
| Glow-in-the-Dark Paint | Apply glow-in-the-dark paint to cheesecloth or fabric | Eerie glow |
| Facial Features | Add eyes, mouths, and other features using markers or paint | Engaging and expressive |
| Weatherproofing | Apply waterproof sealant and UV-resistant coating | Protected from weather conditions |
Display Ideas for Maximum Impact
To make your Halloween decor spooky, try different display ideas for your ghost lanterns. Where you place them can change your whole look and make your party memorable.
Indoor Arrangement Suggestions
For indoor ghost lanterns, think about putting them on mantels, staircases, or coffee tables. This makes them a key part of your decor. Grouping them in odd numbers can make them more interesting to look at.
For a bigger wow factor, put them with Halloween decorations like cobwebs, skeletons, or dry ice. This adds a cool smoking effect.
Outdoor Hanging Techniques
Outdoor ghost lanterns can make your Halloween display magical. Use fishing line or clear thread to hang them from trees, porch ceilings, or gazebos. Make sure they’re secure against wind and weather.
Try hanging them at different heights to make it seem like they’re floating.
Creating Ghost Lantern Clusters
Grouping ghost lanterns together can make them more striking. Mix different sizes and play with spacing for the best look. You can place them on a porch, in a window, or on a patio table.
For an extra scare, add fake spiders, bats, or skeletons around your lantern groups.
Using these display ideas, you can create a Halloween atmosphere that will wow your guests. As “The key to a great Halloween display is creativity and attention to detail.” Follow these tips to make your Halloween spooky and welcoming.
Troubleshooting Common Ghost Lantern Problems
Ghost lanterns can sometimes face issues, even with careful planning. You might encounter wrinkled fabric, adhesive failures, or weak light effects. But, there are solutions for these common problems.
Fixing Wrinkles and Fabric Issues
Wrinkled or soggy fabric can spoil the ghostly look of your lantern. To fix it, gently stretch the fabric while it’s damp. Or, use a fabric refresher spray to remove wrinkles.
If the problem persists, a handheld steamer can help. It relaxes the fabric without damaging it.
Solutions for Adhesive Failures
If your cheesecloth isn’t sticking, check your adhesive. Make sure it’s right for fabric. You can also apply a thin, even layer of adhesive.
For stubborn areas, try a different adhesive. A spray adhesive or a hot glue gun might work better.
Enhancing Weak Light Effects
To improve weak light effects, use a brighter LED candle. Adjust the light source’s placement too. You can also try different fabric densities for the right glow.

5-Minute Mini Ghost Lanterns for Kids & Last-Minute Decor
Make Halloween decorating easy with our 5-Minute Mini Ghost Lanterns. They’re great for kids and those in a hurry. These mini lanterns bring a spooky vibe to your decor without needing to be crafty.
Simplified Materials List
To make these mini ghost lanterns, you’ll need a few basic things:
- Small glass containers or jars
- White tissue paper or gauze
- Scissors
- Glue or a glue stick
- A tea light or small LED light
Quick Assembly Instructions
Here’s how to put together your mini ghost lanterns:
- Wrap the tissue paper or gauze around the glass container for a ghostly look.
- Hold it in place with glue.
- Put a tea light or small LED light inside.
- Your mini ghost lantern is now ready to show off.
Creative Variations for Different Ages
You can make these mini ghost lanterns for different ages:
| Age Group | Variations |
|---|---|
| Younger Kids | Use brighter colors and simpler designs. |
| Older Kids | Add more detailed designs or glow-in-the-dark paint. |
| Adults | Try different textures or complex ghostly designs. |
By following these easy steps and tips, you can make cute and spooky mini ghost lanterns. They’ll add a fun touch to your Halloween decor.
Conclusion: Light Up Your Halloween with DIY Ghost Lanterns
Making your own DIY ghost lanterns is a fun and easy way to add a spooky vibe to your Halloween. With simple materials, you can create unique and eerie decorations. These will impress your friends and family.
In this guide, we’ve shown you how to make ghost lanterns in different ways. From classic cheesecloth designs to no-sew fabric ghosts, we’ve got you covered. Our step-by-step instructions will help you bring your Halloween decorations to life.
By choosing the right materials and following our tips, you can create a hauntingly beautiful atmosphere. This will make your Halloween party unforgettable. So, get creative and enjoy making your own spooky decorations with diy ghost lanterns. They’re perfect for halloween decorations that create a spooky ambiance with simple materials.
What is the best glue to use for cheesecloth crafts?
Mod Podge or a hot glue gun works well for cheesecloth crafts. Mod Podge dries clear and won’t harm the cheesecloth. But, be careful with hot glue to avoid lumps.
How do I prevent wrinkles in my cheesecloth ghosts?
Stretch the cheesecloth while applying adhesive to avoid wrinkles. Use a spray adhesive or Mod Podge for a smoother fabric. If wrinkles remain, iron the cheesecloth on a low setting before shaping.
Can I use real candles with my ghost lanterns?
Real candles are not safe with cheesecloth due to fire risks. Use battery-operated tea lights or LED candles instead. They’re safer and just as cozy.
How do I make my ghost lanterns weatherproof for outdoor display?
Apply a waterproof coating like Mod Podge or clear acrylic spray to protect your lanterns. Make sure LED lights are also sealed from moisture. Use a waterproof container or a clear plastic bag to shield from rain.
What are some kid-friendly alternatives for making ghost lanterns?
Use plastic containers instead of glass for a kid-friendly version. Simplify the materials list and avoid hot glue guns. Use glue sticks or other safe adhesives instead.